How Do You Braid Hair For A Sew In : How To Braid Hair For A Sew In With Closure How To Wiki 89. Lift and move each strand with the same amount of pressure, so that you don't have on are too tight, and the other loose. If you can, braid it in a circular beehive shape. Overlap, and cut your braid. The middle part sew in is a piece of hair which is actually a lace closure used to seal the deal around your hair. A conditioner with slip will help make it easy to detangle your extensions and keep the hair underneath hydrated.
When the braids are skinny, this prevents a look. Sew 1/4″ (0.6cm) from the raw edge all the way around the hemline. You want to make sure that your braids are flat and secure, so your weave doesn't have a helmet effect, bennet says. Though you might experience some extra weight due to extensions. Weaves normally last from 6 to 8 weeks.
40 Gorgeous Sew In Hairstyles That Will Rock Your World from www.styleinterest.com Now turn your horsehair braid to the inside of your skirt. Overlap, and cut your braid. Give the hair a few good rinses to ensure all of the conditioner is rinsed away. Most braiders would either do it in a circular pattern and sew down the braid sticking out or braid it in a horizontal pattern and sew down the little braid at the end. As you do this you will be essentially creating a rolled hem, where your total seam allowance is 1/2″ (1.3cm). These braids are created by cornrowing. If you can, braid it in a circular beehive shape. Part your hair, braid it into your desired number of braids and put a wig cap on it.
Most braiders would either do it in a circular pattern and sew down the braid sticking out or braid it in a horizontal pattern and sew down the little braid at the end.
The middle part sew in is a piece of hair which is actually a lace closure used to seal the deal around your hair. I don't think braiding it straight back would work too well. Split the division into three parts. Otherwise, the wefts might be visible. Tie the top section using a hair tie or scrunchie and start working on the bottom section. In most instances, this is going to be a braid. Continue until the entire hem has the braid stitched on. To sew hair extensions effectively, you need something to attach them to. The right sew in pattern will ensure your tracks remain flat and your style impeccable, whether you want to don a side part sew in, middle part sew in, or throw your hair up in a messy bun. If you can, braid it in a circular beehive shape. It is not painful and won't prick your scalp. It is best to make the braids skinny and to place them fairly close together. See more ideas about sew in braids, sew in braid pattern, braid patterns.
You want to make sure that your braids are flat and secure, so your weave doesn't have a helmet effect, bennet says. Start on one side of the head and make the first stitch at the front. The curved needle should make it very easy to go through the braid and piece of hair. This is perfect to use on garments that you want to add structure to. In most instances, this is going to be a braid.
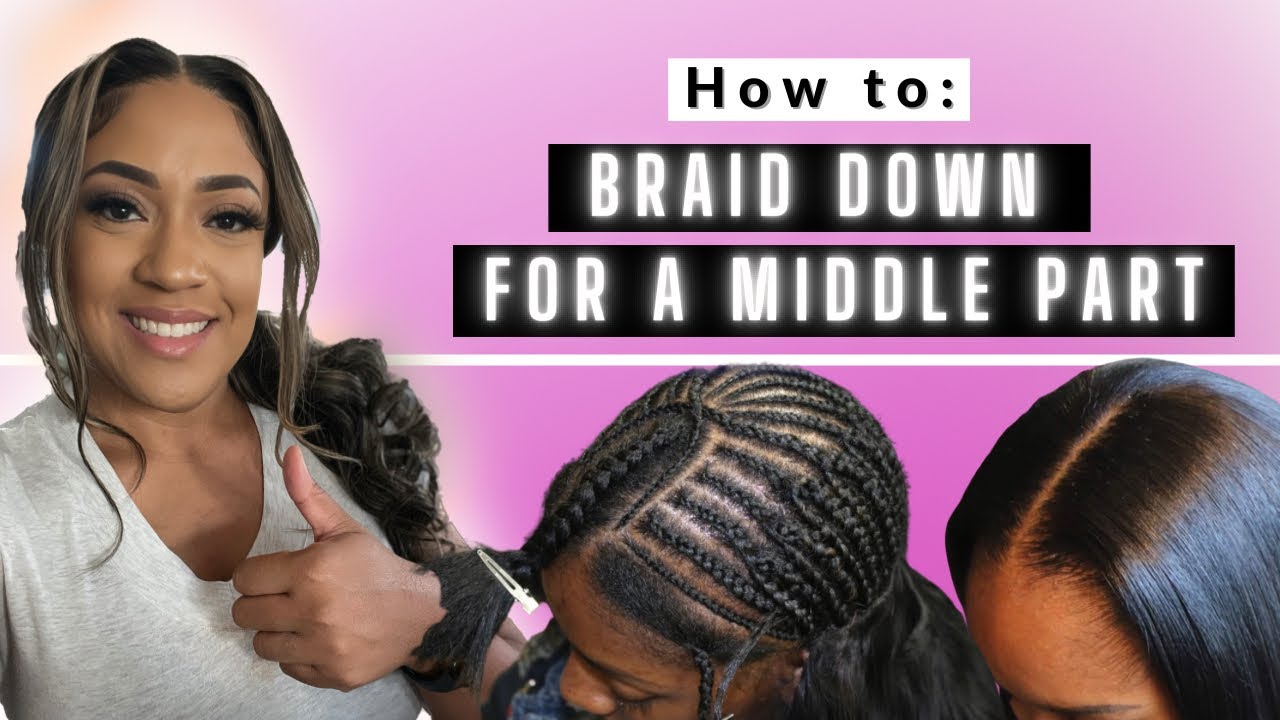
How To Braid Pattern For A Middle Part Sew In Youtube from i.ytimg.com If you can, braid it in a circular beehive shape. Apply your favorite oil to your scalp to help prevent dryness. If you want to minimize shedding, fold over the weft at the edges as your weave hair extensions are sewn in the opposite direction. To sew them, loop the tail up so it runs parallel to the rest of the braid. When you've reached the end of your part and you've used all the sectioned hair to create your cornrow, secure the end of the cornrow braid with a hair elastic or rubber band. Protective hairstyles such as braids or twists are a great way to retain the hair's natural glow, an easy updo during the summer, or even a fashionable method to take your mind off from daily styling and combing.this, however, does not mean you do not need to take care of your scalp. As you do this you will be essentially creating a rolled hem, where your total seam allowance is 1/2″ (1.3cm). The right sew in pattern will ensure your tracks remain flat and your style impeccable, whether you want to don a side part sew in, middle part sew in, or throw your hair up in a messy bun.
When you've reached the end of your part and you've used all the sectioned hair to create your cornrow, secure the end of the cornrow braid with a hair elastic or rubber band.
Weaves normally last from 6 to 8 weeks. If not, just braid small cornrows. It is recommended to work around the front of the head and all the way around the head working towards the crown. Lift and move each strand with the same amount of pressure, so that you don't have on are too tight, and the other loose. A conditioner with slip will help make it easy to detangle your extensions and keep the hair underneath hydrated. If you can, braid it in a circular beehive shape. To secure the end of the braids, either pull them all into a ponytail or sew them down. These braids are created by cornrowing. Sew 1/4″ (0.6cm) from the raw edge all the way around the hemline. In most instances, this is going to be a braid. As you do this you will be essentially creating a rolled hem, where your total seam allowance is 1/2″ (1.3cm). If you want to minimize shedding, fold over the weft at the edges as your weave hair extensions are sewn in the opposite direction. You can start the braiding just over the left or right eyebrow if all of the hair is being braided.
If you can, braid it in a circular beehive shape. When you've reached the end of your part and you've used all the sectioned hair to create your cornrow, secure the end of the cornrow braid with a hair elastic or rubber band. Some women just take most of the braid down with hopes that when the shampoo hits it, it will magically finish unraveling and detangle itself. This style can be worn in various ways, with different types of weave lengths and textures. Give the hair a few good rinses to ensure all of the conditioner is rinsed away.
How To Sew In Weave Yourself Step By Step Tutorial Part 3 Of 7 Howtoblackhair Com from i.ytimg.com I don't think braiding it straight back would work too well. When you've reached the end of your part and you've used all the sectioned hair to create your cornrow, secure the end of the cornrow braid with a hair elastic or rubber band. Sew 1/4″ (0.6cm) from the raw edge all the way around the hemline. Lift and move each strand with the same amount of pressure, so that you don't have on are too tight, and the other loose. Keep in mind that you need to leave about half an inch of space at the beginning and the end of the cornrow. If you can, braid it in a circular beehive shape. Give the hair a few good rinses to ensure all of the conditioner is rinsed away. Apply your favorite oil to your scalp to help prevent dryness.
Or you can go for tighter curls without any compromise in the quality of the final style.
First you must actually take down each and every braid. You are sewing the horsehair braid onto the right side of the garment's hem. Take the time to take all of your hair down. When you've reached the end of your part and you've used all the sectioned hair to create your cornrow, secure the end of the cornrow braid with a hair elastic or rubber band. Here is a close up of a your horse hair braid and fabric sandwich should look like. This includes hair that was braided for a sew in as well. Braid the rest of your hair. The curved needle should make it very easy to go through the braid and piece of hair. Pin the horsehair braid around the hem until you reach the bound section. If not, just braid small cornrows. Apply your favorite oil to your scalp to help prevent dryness. It follows a process that takes about 4 to 6 hours. Start on one side of the head and make the first stitch at the front.